Unlocking Culinary Potential: Why Mastering Green Onion Cuts Matters
Green onions, also known as scallions or spring onions, are culinary chameleons. From adding a vibrant splash of color to delicate garnishes to infusing robust flavor into hearty stir-fries, their versatility is unmatched. Yet, many home cooks simply chop them without much thought. What if we told you that the way you slice and dice this humble allium could profoundly impact your dish's flavor, texture, and visual appeal?
Mastering how to cut green onions is more than just a kitchen chore; it's a fundamental step in elevating your cooking and a fantastic way to sharpen your knife skills. This guide will walk you through five distinct techniques, each designed to achieve specific culinary outcomes, transforming your green onion game from basic to brilliant.
Prepping Your Green Onions: The Foundation for Flawless Cuts
Before you begin any cutting technique, proper preparation is essential. This ensures cleanliness and sets you up for precise results:
- Rinse Thoroughly: Hold your green onions under cool running water. Gently rub away any visible dirt or soil, especially between the layers of the white bulb and along the green stalks.
- Pat Dry: Using a paper towel or a clean kitchen towel, pat the green onions completely dry. Moisture on the surface can make them slippery and harder to cut safely and accurately.
- Trim the Ends: Slice off and discard the root ends (typically about ½ inch) as these are tough and stringy. Also, remove any dry, withered, or discolored tips from the green stalks.
- Optional Outer Layer Removal: For particularly thick or older green onions, you might want to peel away the outermost layer of the white part if it feels tough or slimy.
With your green onions pristine and ready, let's explore the five transformative cutting techniques.
Five Essential Green Onion Cutting Techniques for Every Dish
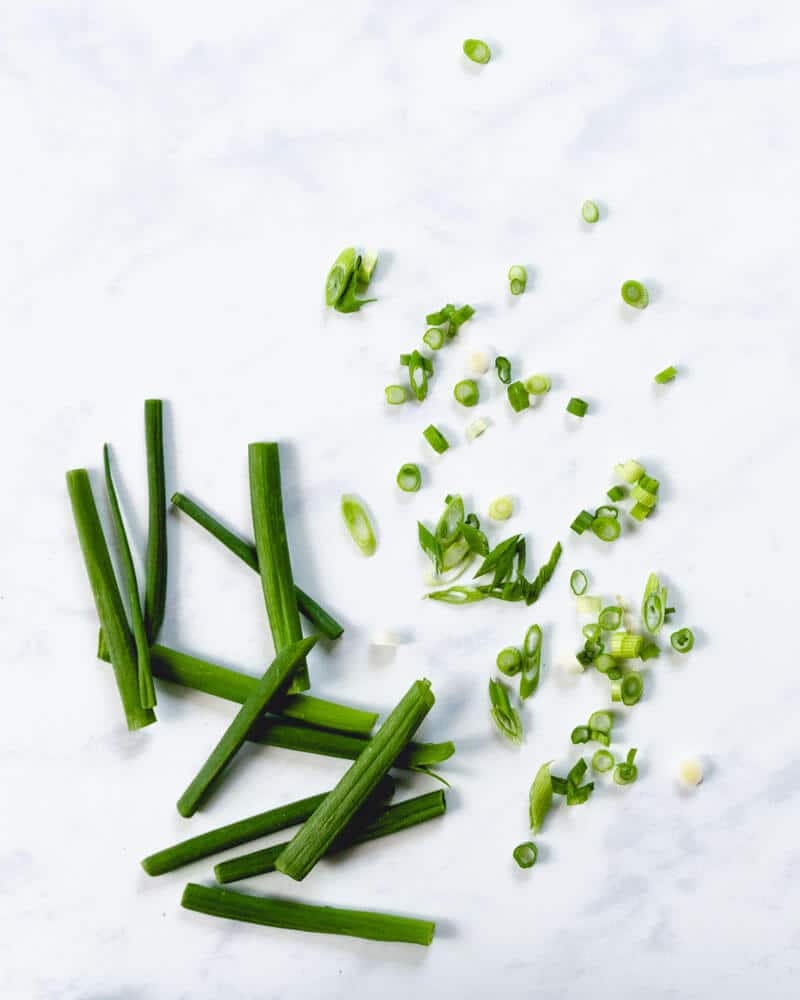
1. Tiny Rings: The Versatile Garnish & Flavor Distributer
Tiny rings are perhaps the most common way how to cut green onions, and for good reason. This simple crosswise slice creates small, uniform pieces that distribute both flavor and color evenly throughout a dish. They are perfect for when you want a subtle oniony kick without overwhelming other ingredients.
- How to Achieve: Lay your prepped green onion flat on your cutting board. Using a sharp chef's knife, hold the green onion firmly with your non-dominant hand, tucking your fingertips under to protect them. Begin slicing thinly across the green onion, moving your knife in a smooth, rocking motion. Aim for slices that are about 1/16 to 1/8 inch thick. You can slice only the green parts for a milder flavor and vibrant color, reserving the white parts for cooking.
- Best For: Garnishing soups (like ramen or miso), topping tacos, sprinkling over omelets, adding to salads, or incorporating into dips and dressings. They provide a delicate crunch and a fresh finish.
- Chef's Tip: For extra small, uniform rings, you can stack several green onion stalks together and slice them simultaneously.
2. Thick Slices: For Robust Flavor & Culinary Endurance
When you need your green onions to stand up to heat and contribute a more substantial texture, thick slices are your go-to. This cut allows the green onions to caramelize beautifully, developing a sweeter, more mellow flavor while retaining a satisfying bite.
- How to Achieve: Similar to tiny rings, you'll slice crosswise, but aim for thicker pieces, roughly ¼ to ½ inch in thickness. The larger surface area allows for better charring and prevents them from disappearing into your dish during cooking.
- Best For: Grilling alongside other vegetables, roasting with root vegetables, adding to stir-fries where they can soften slightly but maintain structure, or incorporating into heartier salads where you want a noticeable crunch and flavor burst.
- Flavor Insight: The white parts, when cut thick, will develop a wonderfully sweet and slightly pungent flavor when cooked, contrasting beautifully with the milder green tops.
3. Bias Cut: The Elegant & Aesthetically Pleasing Slice
The bias cut is where visual appeal truly shines. By slicing at an angle, you create elongated, oval-shaped pieces that look sophisticated and elegant, making them ideal for presentation-focused dishes. This cut also slightly increases the surface area, which can influence how quickly the green onions release their flavor.
- How to Achieve: Place your green onion on the cutting board. Position your knife at a 45-degree (or steeper) angle to the green onion. Slice into pieces about ½ to 1 inch long. Maintain a consistent angle for uniform results.
- Best For: Garnishing Asian-inspired dishes, adding to noodle bowls, stir-fries where you want a beautiful diagonal cut, or any dish where presentation is key. The elongated shape adds dynamic texture.
- Presentation Pro-Tip: Use this cut for the vibrant green parts of the onion to maximize visual impact.
4. Thin Strips (Julienne): For Texture & Intense Flavor Bursts
Often referred to as the "Julienne" technique for green onions, thin strips offer a dramatic textural element and a concentrated burst of flavor. This cut requires a bit more precision and a very sharp knife, but the results are incredibly rewarding.
- How to Achieve: First, cut the green onions into manageable lengths (e.g., 2-3 inches). Then, carefully slice each length lengthwise into very thin strips, ideally about 1/16 to 1/8 inch wide. For ease, you can slightly flatten the green onion sections before slicing. A sharp paring knife can be useful here for greater control, but a chef's knife can also work. Always exercise caution and go slowly.
- Best For: Garnishing soups, spring rolls, and sandwiches where you want a pronounced onion flavor and a delightful crunch. They also integrate beautifully into delicate salads without feeling chunky.
- Safety First: When slicing thinly, keep your guiding hand's fingertips tucked back, using your knuckles as a guide.
5. Curls for Garnish: The Show-Stopping Decorative Element
If you want to truly impress with your culinary artistry, green onion curls are a fantastic technique. These delicate, spiraling garnishes add an unexpected touch of elegance and freshness to any plate.
- How to Achieve: Start by separating the green stalks from the white parts (the white parts are less suitable for curling but can be used in other dishes). Stack several green stalks together. Using a very sharp knife, make a strong bias cut (as in technique 3), slicing into extremely thin strips. The longer and thinner your bias cuts, the more dramatic the curl will be. Immediately transfer these thin strips into a bowl of iced water. Within 15-30 minutes, they will curl beautifully.
- Best For: High-end presentations, elaborate garnishes for platters, adding a professional touch to appetizers, or as a vibrant, fresh flourish on main courses.
- Science Behind the Curl: The cold water causes the plant cells to absorb water and swell, making the thin strips curl due to differing rates of water absorption and cell expansion on opposing sides of the cut.
Beyond the Cut: Maximizing Your Green Onion Experience
Understanding how to cut green onions is just the beginning. To truly master this versatile vegetable, consider these additional insights:
- The Power of a Sharp Knife: Regardless of the technique, a sharp knife is your best friend. It not only makes cutting easier and more precise but also significantly reduces the risk of accidents. Dull knives require more force, leading to slips.
- Utilizing Both Parts: Don't discard the white parts! The white and light-green sections near the root have a stronger, more pungent flavor, ideal for cooking, sautéing, or adding to sauces and marinades. The darker green tops are milder and perfect for garnishing or adding fresh flavor at the end of cooking.
- Strategic Storage: To extend the life of your cut green onions, store them in an airtight container lined with a damp paper towel in the refrigerator. For whole green onions, stand them upright in a glass with a small amount of water, covering the greens with a plastic bag, and refrigerate.
- Practice Makes Perfect: Green onions are an economical and forgiving vegetable, making them excellent for practicing your knife skills. The more you practice these different cuts, the more confident and efficient you'll become.
Conclusion: Elevate Your Culinary Artistry, One Slice at a Time
From the subtle whisper of tiny rings to the dramatic flourish of delicate curls, the way you choose to cut your green onions can transform an ordinary dish into an extraordinary one. By understanding these five core techniques – Tiny Rings, Thick Slices, Bias Cut, Thin Strips, and Curls for Garnish – you unlock a new dimension of flavor, texture, and visual appeal in your cooking. So grab your sharpest knife, embrace the practice, and start experimenting. Your taste buds, and your guests, will thank you.
